 Scis
ScisDrawing and editing paths
Every vector object in Scissor is built from paths: a chain of anchor points joined by straight or curved segments. This page covers how to draw them, how to reshape them point by point, and the commands that join, offset, outline and combine them.
Shortcuts are written in their macOS form. On Windows, read ⌘ as Ctrl, ⌥ as Alt and ⇧ as Shift.
Anchors, handles and the shape of a path
A path is a run of anchor points. Between two neighbouring anchors lies a segment, which is straight when neither anchor reaches towards it and curved when one or both do. The reach of an anchor is set by its two direction handles: the incoming handle shapes the segment arriving at the anchor, and the outgoing handle shapes the segment leaving it. Drag a handle further out and the curve bulges more strongly towards it. A path can be open, with two loose ends, or closed, where the last anchor joins back to the first.
Corner and smooth points
An anchor is either a corner or a smooth point. At a smooth point the two handles are locked into a straight line through the anchor, so the curve passes through without a kink and stays continuous. At a corner point the two sides are independent: the path can change direction sharply, and one side can be straight while the other curves. Most shapes mix the two, smooth points along the flowing parts and corner points where an edge turns.
- Smooth point
- Handles tied together in a line. Use these along a curve that should read as one continuous sweep, such as the side of a leaf or the bowl of a letter.
- Corner point
- Handles that move apart, or a point with no handles at all. Use these at the tip of a star, the corner of a box, or wherever a curve should meet a straight edge.
Anchors, handles and the Direct Selection tool
The Direct Selection tool (A) works on the parts of a path. Click an anchor to select it, ⇧-click to add or remove one, or drag a marquee over empty space to catch every anchor inside it. Dragging selected anchors moves them; ⇧ restricts the move to 45° steps. Reach for it whenever a shape is nearly right and only a point or two needs nudging.
Drag a handle to change the curve on its side. Handles that belong to a smooth anchor move together, so the curve stays continuous; hold ⌥ as you drag to break that link and steer one side alone, and ⇧ to hold the handle to an angle. You can also drag a segment itself: a curved segment bends under the pointer, and a straight one carries both of its anchors along.
The Group Selection tool shares this slot and picks whole objects out of a group rather than anchors. Click once for the innermost object, click again to step out to the group around it.
Drawing tools
Scissor has three tools for laying down a path from scratch. The Pen gives exact control point by point, the Curvature tool fits a smooth curve through points you place, and the Pencil follows your hand freely.
| Tool | Shortcut | Best for |
|---|---|---|
| Pen | P | Precise outlines where every anchor and handle is placed on purpose. |
| Curvature | ⇧~ | Flowing curves defined by a few through-points, with no handle wrangling. |
| Pencil | N | Loose, hand-drawn shapes and quick sketches. |
The Pen tool
The Pen tool (P) builds a path point by point. Click to drop a corner anchor; press and drag instead and the anchor keeps handles, so the path leaves it as a curve. Hold ⇧ while you drag to hold the handle to 45° steps, and hold ⌥ to move only the outgoing handle, which turns the anchor into a corner and frees the next segment from the last one.
While a path is open the tool changes as you move over it. Over the first anchor it closes the path, over a segment it adds an anchor, and over an existing anchor it removes one. With no path in progress, moving over the loose end of an open path picks that path up so you carry on drawing from it. Enter or Esc ends the path and leaves it open; Delete removes the anchor you last placed.
The Curvature tool
The Curvature tool (⇧~) fits a smooth curve through the points you click, with a preview running to the pointer as you go. ⌥-click to drop a corner point rather than a smooth one, and double-click any point to switch it between the two. Drag a point to move it and the curve refits. Click the first point to close the shape, or press Enter to finish. Delete removes the last point and Esc abandons the path. Use it when you care about the shape of the curve more than the exact anchors, since it works out the handles for you.
The Pencil tool
The Pencil tool (N) draws freehand: press, draw, and let go, and Scissor fits a smooth path through the trail. Release near where you started, or hold ⌥ as you finish, and the path closes into a shape. The result is a stroked open path in the current stroke colour, so it is ready to keep as a line or to fill. How closely the fitted path hugs your movement is set by the Pencil fidelity preference, from accurate, which keeps more anchors and every wobble, to smooth, which uses fewer anchors and irons the line out. Reach for it for sketching, signatures, and any shape that should look hand-drawn rather than constructed.
Editing points on a path
Adding, removing and converting points
The Pen shares its toolbar slot with Add Anchor Point (+), Delete Anchor Point (−) and the Anchor Point tool (⇧C). Add Anchor Point drops a new point on a segment without changing the curve; Delete Anchor Point removes the point you click and lets the path close the gap. With the Anchor Point tool, drag from a corner anchor to pull out a matched pair of handles, turning it smooth; drag a single handle to break the pair so the two sides move apart, turning it back to a corner; and click a smooth anchor to strip its handles to a sharp corner.
Object › Path has the same edits as commands that work on the whole selection at once. Add Anchor Points puts a new anchor in the middle of every segment, doubling the point count without changing the shape, which is handy before a distort or warp that needs more points to bend cleanly. Remove Anchor Points takes out the anchors you have selected with the Direct Selection tool and refits the path through what is left.
Reshaping by hand: Smooth, Path Eraser and Join tools
Three brush-style tools reshape a path where you drag rather than at a single anchor. They act on the selected paths, or on any path under the brush when nothing is selected, and [ and ] shrink and grow the brush.
- Smooth tool
- Drag along a path to relax it, thinning out anchors and softening bumps. Use it to calm a jittery pencil line or a traced edge.
- Path Eraser tool
- Drag along a path to rub out the part you cross, splitting or shortening it. Use it to trim a stray tail off a line.
- Join tool
- Scrub across two open ends and they are joined, extending or trimming the paths to meet cleanly at a corner. Use it to close up a gap where two strokes should have met.
Cutting a path: Scissors and Knife
The Scissors tool (C) cuts at a single place. Click a segment or an anchor and the path is split there: a closed path opens at the cut, and an open path breaks into two separate objects. Use it to snip an opening in a circle, or to break a shape apart so the halves can be styled differently.
The Knife slices right across artwork. Drag the blade over an object to cut it into separate pieces along the drawn line; hold ⌥ to cut in a straight line, and add ⇧ to hold that line to 45° steps. With something selected, only the selected objects are cut; otherwise everything the blade crosses is. Use it to carve a filled shape into several closed pieces in one stroke.
Path commands
Object › Path gathers the operations that act on whole paths at once.
| Command | Shortcut | What it does |
|---|---|---|
| Join | ⌘J | Links open ends into one path, or closes a single open path. |
| Average… | ⌥⌘J | Moves selected anchors to their common position. |
| Outline Stroke | Turns a stroke into a filled shape of the same outline. | |
| Offset Path… | Makes a copy grown or shrunk by a set distance. | |
| Reverse Path Direction | Flips which way the path runs. | |
| Simplify… | Reduces the number of anchor points. | |
| Add Anchor Points | Adds a point at the middle of every segment. | |
| Remove Anchor Points | Removes the selected anchors. | |
| Split Into Grid… | Cuts the selection into a grid of rows and columns. | |
| Clean Up… | Deletes stray points, unpainted objects and empty text. |
Join and average
Join (⌘J) works on open paths. With two separate open paths selected, it links their nearest ends into one path; with a single open path, it joins the two loose ends to close it. Ends that already sit on top of each other are merged into one anchor. Use it to close a shape you drew as an open outline, or to stitch two half-drawn strokes together.
Average (⌥⌘J) moves the selected anchors to their shared average position. The dialog offers the horizontal axis, which lines the points up to a common height; the vertical axis, which lines them up in a column; or both, which stacks them all on one spot. Reach for it to level a row of points or to bring two ends together before you join them.
Simplify
Simplify redraws the selected paths with fewer anchor points, staying within an accuracy you set: a tighter accuracy keeps close to the original at the cost of more points, a looser one smooths the shape down to a handful. Use it to clean up a traced or hand-drawn path that carries far more points than the shape needs, which makes it lighter to edit and to render.
Offset Path
Offset Path builds a fresh path a set distance from the original: a positive offset grows the outline outward and sits behind the original, a negative offset shrinks it inward and sits in front. The Joins setting decides how outward corners are treated, as a sharp Miter, a rounded Round or a flattened Bevel, with a miter limit that caps how long a sharp corner may run before it is clipped. Use it to draw an even border around a shape, to inset a shape for a keyline, or to fatten a thin form. Offset Path is also available under Effect › Path as a live effect that recomputes when the shape changes.
Outline Stroke
Outline Stroke replaces a stroked path with a filled shape that has exactly the stroke's outline. Once outlined, the width no longer scales with the object and cannot be edited as a stroke, but the outline can be reshaped point by point, filled with a gradient, or combined with other shapes. Reach for it when you need the stroke to behave as artwork: to give a line a tapering or varied edge you then adjust by hand, or to keep a design's line weights fixed when it is scaled. It is available as a live effect too, under Effect › Path.
Reverse Path Direction
Reverse Path Direction flips the order the anchors run in, so the path travels the other way round. Direction rarely shows on its own, but it decides which contour is the hole in a compound path and where a brush or arrowhead starts and ends. Use it when a hole in a compound path fills in solid, or when text on a path or a stroke's start and end sit on the wrong side.
Editable shapes and their widgets
Rectangles, rounded rectangles, ellipses and polygons stay live: they keep their parameters and rebuild their path whenever you change one. While you drag a shape out, ⇧ makes it regular and ⌥ draws it from the centre. The arrow keys work during the drag too, up and right add, down and left subtract, changing the sides of a polygon, the points of a star, or the corner radius of a rounded rectangle.
Select a single live shape and small round handles appear just inside its corners; they are hidden when the shape is too small on screen to show them clearly. Drag one with the Selection tool (V) to round all the corners at once, or with Direct Selection to round only the corner you are holding. ⌥-click a corner handle to step it through round, inverted and chamfer, again all four corners with the Selection tool, one corner with Direct Selection.
An ellipse shows a square handle instead: one on a whole ellipse, and one at each end of the pie once you have opened one. Drag one to open a wedge out of the shape, with ⇧ snapping the angle to 15° steps; bringing the end back round to the start restores the whole ellipse. The Properties panel holds the same values as numbers: radius and corner type, per-corner radii, polygon sides, and pie start and end in degrees. A live shape keeps these controls until you edit its path directly, which turns it into an ordinary path.
Combining shapes: Merge & Split and Combine Shapes
When two or more shapes overlap, you often want a single new shape out of them: a union, a hole, or the piece where they cross. Scissor offers two ways to get there. The Merge & Split is direct and visual; the Combine Shapes panel applies the same operations as buttons. Both keep curves rather than flattening them to line segments.
The Merge & Split tool
The Merge & Split tool (⇧M) works on two or more selected paths. It divides their overlaps into regions and highlights whichever one the pointer is over; drag a line across several regions to merge them into one object, which takes the appearance of the shape it came from, or ⌥-drag across them to delete them. Use it to build a shape by eye, adding the parts you want and rubbing out the parts you do not, without stopping to pick a command for each step.
Combine Shapes shape modes
The Combine Shapes panel (⇧⌘F9) opens with four shape modes, each of which replaces the selected paths with one combined path. The result takes the appearance of the top object, except for Minus Front, which keeps the appearance of the bottom one.
- Unite
- Merges every selected shape into one outline. Use it to weld overlapping pieces into a single silhouette, such as a cloud from a row of circles.
- Minus Front
- Keeps the backmost shape and cuts away everything stacked in front of it. Use it to bite a chunk out of a shape, such as carving a crescent moon from two circles.
- Intersect
- Keeps only the area every selected shape shares. Use it to trim artwork down to a common region, such as the lens where two circles cross.
- Exclude
- Keeps everything except the overlaps, which become holes. Use it to make a ring, or a chain link, where the crossing parts drop out.
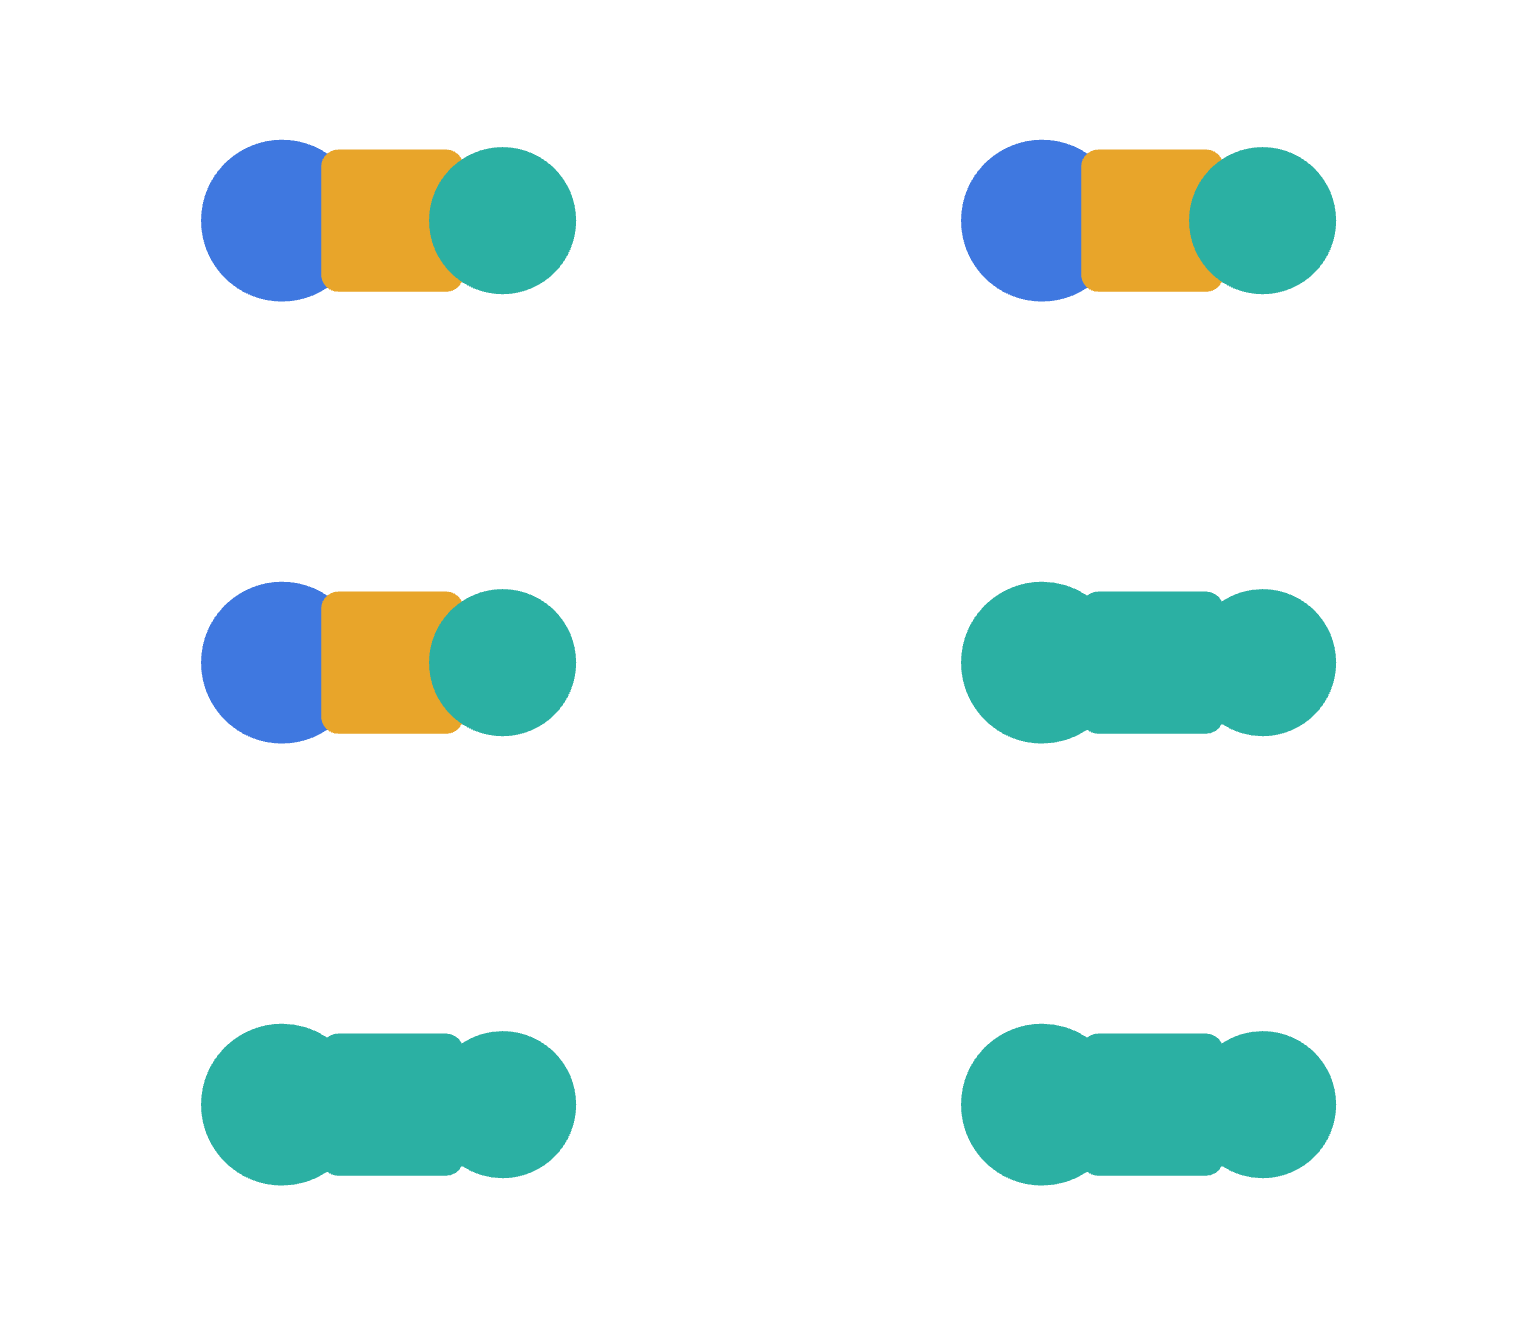
The other Combine Shapes operations
Below the shape modes sit six pathfinders. These leave you with several pieces, gathered into a group, rather than one combined path. Minus Back matches its shape-mode namesake but keeps the top shape.
- Divide
- Cuts the shapes into separate faces along every line they cross, each face taking the colour of the top shape covering it. Use it to break a design into paintable pieces, like the cells of a stained-glass panel.
- Trim
- Removes the hidden part of each shape where a shape above covers it. Every piece keeps its own fill and nothing is merged; strokes are dropped. Use it to flatten stacked flat-colour artwork so no colour prints on top of another.
- Merge
- Trims away the hidden parts, then unites neighbouring pieces that share a fill colour. Use it to tidy a flat-colour illustration, joining same-coloured regions into single shapes.
- Crop
- Keeps only the parts of the lower shapes that fall inside the topmost shape, which is then discarded. Use it to clip artwork to a frame and bake the crop into the paths, rather than keeping a live clipping mask.
- Minus Back
- Keeps the frontmost shape and cuts away everything behind it. Use it when the top shape is the keeper and the shapes below it should carve into it.
- Outline
- Turns every region boundary into an open line, stroked in the fill colour it came from. Use it to pull the skeleton of edges out of a set of overlapping shapes.
Effect › Combine Shapes applies Add, Intersect, Exclude, Subtract and Minus Back as live effects on a group instead, leaving the original objects intact and editable underneath. Reach for the effect versions when you may still want to move the parts around later; reach for the panel when the combined shape is final.
Compound paths and clipping masks
Object › Compound Path › Make (⌘8) folds the selected paths into one object filled by the even-odd rule, so an inner contour cuts a hole through the one around it. The result takes the appearance of the lowest object in the selection. Release (⌥⇧⌘8) gives each contour back as a path of its own. Use a compound path for any shape with a hole, such as the counter of the letter O or a washer.
Object › Clipping Mask › Make (⌘7) uses the topmost selected object, which must be a path, to clip everything below it. Scissor puts them all into a clipping group and clears the mask path's own fill and stroke. Release (⌥⌘7) turns the clipping group back into an ordinary group, so nothing is clipped any more and every object, the mask path included, stays where it was. Make Opacity Mask in the same submenu masks by tone rather than by outline, so lighter parts of the mask show through and darker parts hide.
Smart guides and snapping
Smart guides (View › Smart Guides, ⌘U) watch the visible artwork and the boards as you draw or drag. What you are moving snaps to the edges, centres and anchors of its neighbours, and a line appears back to whatever it lined up with, labelled with the kind of match: anchor, center, corner or align.
Two further guides appear on their own. When the object you are moving would sit at the same distance from its neighbours as they sit from each other, it snaps there and the two equal gaps are drawn with the measurement shown; this works both for continuing a run of evenly spaced objects and for centring one in the gap between two. And when you drag away from a starting point, the direction snaps onto a construction line every 45° from the constrain angle, drawn as a long line with the angle beside it.
Snap to Point (⌥⌘') and Snap to Grid (⇧⌘') are separate switches in the View menu. With Snap to Grid on, everything lands on the grid subdivision and the smart guides stand aside.